Why Choose Floating Shelves?
Have you ever looked at a blank wall and thought, This space could really use something cool and functional? We’ve all been there. Installing floating shelves is one of the easiest ways to transform a wall without a full-blown makeover. They add style, save space, and work in almost any room.
Whether you’re a total beginner, a renter trying to avoid damage, or a DIYer looking for a weekend project—we’ve got you covered. You don’t need to be a handyman or own a ton of tools. With the right steps, anyone can do it.
In this guide, we’ll walk you through the entire process of installing floating shelves the easy way. We’ll cover the tools you need, how to plan your layout, and each step from drill to display. Along the way, we’ll share helpful tips, common mistakes to avoid, and simple styling ideas to make your shelves pop.
Let’s get started and turn that empty wall into something amazing!
Tools and Materials You’ll Need
Before we start installing floating shelves, let’s make sure we have all the right tools and materials ready to go. Being prepared makes the process smoother and a lot more enjoyable.
We’ll need a few basic tools: a power drill, drill bits, stud finder, level, tape measure, pencil, wall anchors, screws, and a screwdriver. These are the essentials for most types of walls. Without them, it’s tough to get shelves up securely and evenly.
Now, let’s talk brackets. Even though floating shelves hide their supports, brackets still do the heavy lifting. Some shelves use a rod-and-sleeve system where the bracket slides into the shelf. Others use a metal cleat that locks into a groove. Both are solid choices—it just depends on the shelf style you choose.
Wall type matters, too. Drywall, plaster, and masonry each require different hardware. For drywall, plastic anchors or toggle bolts work well. Plaster walls may need self-drilling anchors or studs. Masonry will need concrete screws and a masonry drill bit. It’s smart to test your wall first so you know what you’re working with.
We also recommend a few optional tools to make things even easier. A laser level ensures straight lines. Painter’s tape helps guide drilling. A right-angle drill fits in tight spaces. And don’t forget safety goggles—your eyes will thank you.
With everything in place, installing floating shelves becomes a fun and rewarding DIY project.
Planning Your Shelf Placement
Before installing floating shelves, we need to plan where they’ll go. Taking time to measure and mark makes everything easier later.
First, let’s grab a tape measure and pencil. We’ll decide how high the shelves should be and how far apart to space them. If we’re hanging more than one, consistent spacing keeps things looking clean. For eye-level shelves, 48 to 60 inches from the floor works well.
Next, we should think about what the shelves will hold. Heavier items need more support. That affects where we can safely install them.
Now comes the big question—stud or no stud? Installing into a wall stud offers the most support. It’s ideal for heavy shelves or anything holding weight. However, we won’t always hit a stud where we want a shelf. That’s okay, as long as we use the right wall anchors.
To find a stud, we’ll use a stud finder. Slide it slowly along the wall. When it lights up or beeps, mark that spot with a pencil. We’ll double-check by measuring 16 or 24 inches from that point—most studs follow that pattern.
If we can’t find a stud where we need one, don’t worry. We’ll just make sure to use strong anchors made for our wall type.
With good planning, installing floating shelves becomes much easier—and the end result looks much better, too. Let’s move on and get those shelves on the wall!
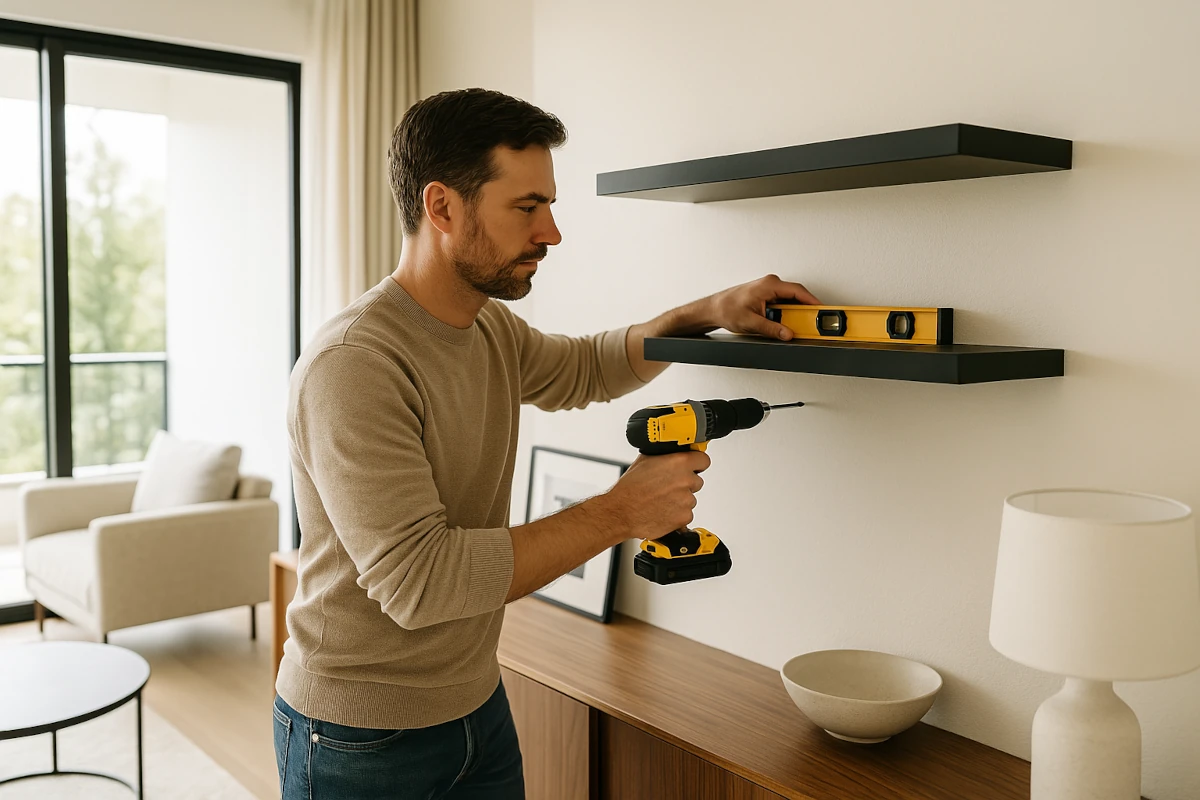
Step-by-Step: Installing Floating Shelves
Now that we’ve gathered our tools and planned our placement, it’s time to start installing floating shelves. Don’t worry—we’ll go slowly and keep things simple. Each step builds on the last, and we’ll share a few helpful tips along the way.
Step 1: Mark Your Spots
First, let’s use our tape measure and pencil to mark where we want the shelf to go. A small piece of painter’s tape can help us visualize the placement before we commit.
Next, we’ll grab our level and make sure our markings are nice and straight. If we’re installing more than one shelf, consistent spacing is key. Double-checking now saves time later.
Step 2: Drill Pilot Holes
Now, it’s time to drill. We’ll start by drilling pilot holes where we made our marks. These small holes guide the screws and prevent wall damage.
Let’s be sure to use a bit that matches the size of our anchors or screws. If we hit a stud, great! If not, we’ll rely on wall anchors for support.
Step 3: Install Wall Anchors or Mount Brackets
If we didn’t hit a stud, we’ll gently tap wall anchors into our pilot holes. These help hold the shelf securely in drywall or plaster.
For shelves with brackets, we’ll mount those next. Line them up with the holes, then screw them into place. It’s a good idea to check for level again before tightening fully.
Step 4: Attach the Shelf
Now comes the fun part! We’ll carefully slide the shelf onto the brackets or rods. Some shelves may lock into place—others just rest on top.
If the fit feels loose or uneven, we’ll remove it and check the hardware. Small adjustments can make a big difference in the final look.
Step 5: Check for Level and Stability
We’re almost done, but let’s be sure everything’s right. We’ll place the level on top of the shelf one more time. If it’s slightly off, we can adjust the brackets before loading it up.
We’ll also press gently on the shelf to check stability. If it wobbles, it may need tighter screws or better anchors.
Safety Tips to Remember
Always wear safety goggles while drilling. Dust and small particles can cause eye injuries. If we’re using a ladder or step stool, make sure it’s stable before climbing.
Never overload shelves—especially on drywall without studs. If we’re unsure how much weight a shelf can hold, it’s better to go light.
Common Beginner Mistakes to Avoid
Skipping the level is a big one. Even a slightly crooked shelf is hard to ignore once it’s up.
Another mistake is using the wrong anchors for the wall type. Let’s always match the anchor to the surface for a secure hold.
Finally, don’t rush. Taking time with each step makes installing floating shelves way easier—and gives us a much better result.
That’s it! We’ve turned a blank wall into something useful and beautiful. And the best part? We did it ourselves, one step at a time.
Decorating and Styling Your Shelves
Now that we’ve finished installing floating shelves, it’s time to style them. This is where we can really show our personality.
Let’s start by thinking about balance. We don’t want one side looking too heavy. So, we’ll mix tall and short items, and vary shapes and textures. Books can anchor one end, while a plant or vase softens the other.
Next, we’ll choose a few favorite decor pieces. Small framed photos, candles, and greenery all work well. We don’t need to overload the shelf—sometimes, less is more. Negative space actually makes each item stand out.
Depending on the room, our shelves can be both pretty and practical. In the kitchen, we can add spice jars or mugs. In the bathroom, they’re perfect for towels and soaps. In a living room or office, books and art are great choices.
It’s okay to rearrange a few times until it feels right. After all, part of the fun of installing floating shelves is making them truly ours. Let’s play around and create a display that makes us smile every time we walk by.
Troubleshooting and Maintenance Tips
Even after installing floating shelves carefully, things don’t always go perfectly. Luckily, most issues are easy to fix with a little know-how.
If our shelf looks uneven, the first step is to check the level. It might just need a slight bracket adjustment. We’ll loosen the screws, reposition the bracket, and tighten again while watching the level closely. Sometimes, it’s the shelf itself that’s slightly warped—flipping it over can help.
If the shelf sags or wobbles, we’ll start by checking the anchors. Over time, they can loosen—especially if the shelf is overloaded. We’ll remove the shelf, tighten the screws, or replace the anchors with stronger ones. If we didn’t hit a stud during installation, upgrading to heavier-duty anchors can make a big difference.
To keep everything looking great, we’ll avoid placing too much weight on one side. Distributing items evenly keeps stress off the brackets. Dusting regularly also helps maintain a clean, polished look. We can use a soft cloth or duster to avoid scratching the surface.
Every so often, it’s a good idea to check for shifting or loosening. Tightening things up takes just minutes but keeps the shelf safe and sturdy.
With a little care, our floating shelves will stay strong and stylish for years to come.
Final Thoughts and Encouragement for DIY Beginners
Installing floating shelves might have seemed tricky at first, but step by step, we made it simple and doable. With the right tools, a little planning, and some patience, we turned an empty wall into something useful and stylish.
If this was your first DIY project, great job! You’ve just built confidence and picked up new skills along the way. We hope it inspires you to try even more small projects around the house.
Every little success builds momentum. So, whether it’s hanging artwork, painting a room, or organizing a closet—let’s keep going.
We’d love to hear how your project turned out! If you have questions, ideas, or tips of your own, feel free to share. DIY is better when we learn together.
Frequently Asked Questions (FAQ) Installing Floating Shelves
1. Do I need to find a stud to install floating shelves? Not always. While studs provide the most support, strong wall anchors can work well on drywall or plaster when studs aren’t available.
2. What kind of drill do I need for installing floating shelves? A basic cordless drill works fine for most walls. For masonry or concrete, you’ll need a hammer drill and masonry bit.
3. How much weight can floating shelves hold? It depends on the brackets, anchors, and wall type. Shelves in studs can hold more—usually 30 to 50 pounds or more.
4. Can I install floating shelves on tile or brick? Yes, but you’ll need the right tools. Use a masonry bit for brick or a tile bit for ceramic surfaces. Go slowly!
5. What’s the best way to keep shelves level during installation? Use a bubble or laser level when marking and installing brackets. Always double-check before fully tightening screws.