Why Your Vanity Deserves a Refresh
When’s the last time your bathroom vanity made you smile? If it’s been a while, it might be time for a bathroom vanity makeover. The best part? We don’t need a sledgehammer, a big budget, or a professional crew to pull it off. And if you’ve been dealing with drips, it’s the perfect moment to fix that leaky faucet while you’re at it—two wins in one weekend!
Instead, we’re talking quick wins—fresh paint, new hardware, and smart little upgrades that pack a big punch. With just a few tools and a free weekend, we can take that worn-out vanity from blah to beautiful without the usual mess or stress.
No experience? No problem. We’ll break down each step so it’s easy to follow, even if this is your first DIY. By the end, you’ll have a bathroom vanity makeover that looks like a million bucks—but cost a whole lot less. Let’s get going!
What You’ll Need: Tools & Supplies Checklist
Before we dive into our bathroom vanity makeover, let’s make sure we’ve got everything ready to roll. A little prep goes a long way.
First, grab the basic tools: a screwdriver, tape measure, and some painter’s tape. These are our go-to essentials for just about every step.
Next, we’ll need materials like paint and primer, new hardware, and contact paper if we’re tackling the countertop. Don’t forget adhesive and caulk—they help everything stay put and look polished.
If you want to go the extra mile, consider swapping the faucet, adding new lighting, or trying a peel-and-stick backsplash. These optional upgrades really boost the wow factor.
With these tools and materials on hand, we’re ready to make our bathroom vanity makeover simple, smooth, and satisfying.
Step 1: Clean and Clear the Space
Before we lift a paintbrush, we’ve got to start with a clean slate. Every good bathroom vanity makeover begins with clearing the space.
First, take everything off and out of the vanity—drawers, doors, baskets, toothpaste tubes… all of it. While we’re at it, go ahead and wipe down every surface. Dust, grime, and old residue can mess with paint or adhesives later.
If we’re removing hardware, hinges, or knobs, let’s stay organized. Label each piece or place them in a small bag so nothing goes missing.
Taking time to clean and clear the area now makes every next step smoother. It also helps us see what we’re working with. A little prep work now saves us from frustration later—and that’s the kind of DIY we like!
Once this part’s done, we’re ready to move on to the fun stuff. Our bathroom vanity makeover is officially underway!
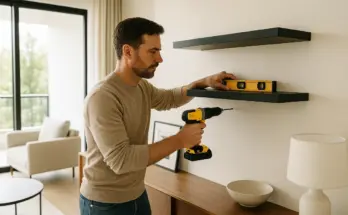
Step 2: Update the Hardware
Here’s where things start getting exciting—new hardware! Swapping out knobs and pulls is one of the fastest ways to make a statement.
For a bathroom vanity makeover, the right hardware can completely change the vibe. Think modern matte black, brushed brass, or even vintage glass. Whatever your style, there’s a finish to match.
Before we buy anything, though, let’s measure. Specifically, measure the distance between the screw holes on your existing handles. This is called the “center-to-center” measurement. Getting this right means we won’t need to drill new holes—or patch old ones.
While we’re at it, double-check how many knobs and pulls we actually need. It’s easy to forget drawer handles when we’re in the aisle staring at shiny options.
Once we’ve got our new hardware in hand, it’s just a matter of grabbing a screwdriver and making the switch. It takes just minutes but adds a fresh, updated look we’ll love.
This step alone can make our bathroom vanity makeover feel nearly complete!
Step 3: Add a Fresh Coat of Paint
Now we’re really turning up the volume on this bathroom vanity makeover. A new coat of paint can make old cabinets feel brand new.
Start With a Light Sanding
First things first—let’s scuff up the surface with a light sanding. No need to go overboard. We’re just giving the primer and paint something to grip. Use 120–150 grit sandpaper and go over every surface you plan to paint. Wipe it clean with a damp cloth when you’re done.
Don’t Skip the Primer
If your vanity has a glossy finish or laminate surface, primer is a must. It helps the paint stick and last longer. Use a bonding primer for best results. It only takes a few extra minutes but makes a huge difference.
Pick the Right Paint
Bathrooms get steamy and messy, so let’s use paint that can handle it. Go for semi-gloss or enamel—they’re easy to clean and resist moisture. Bonus: they also look great with minimal effort.
Let’s Paint Like Pros
Tape off the walls, sink edges, and any spots you don’t want to paint. Apply primer and let it dry fully. Then, paint in light, even coats. Two coats usually do the trick. Let each coat dry completely before moving on.
Taking your time here will pay off. A smooth, durable finish is key to a long-lasting bathroom vanity makeover. Once the paint dries, you’ll be amazed at how fresh and clean it looks!
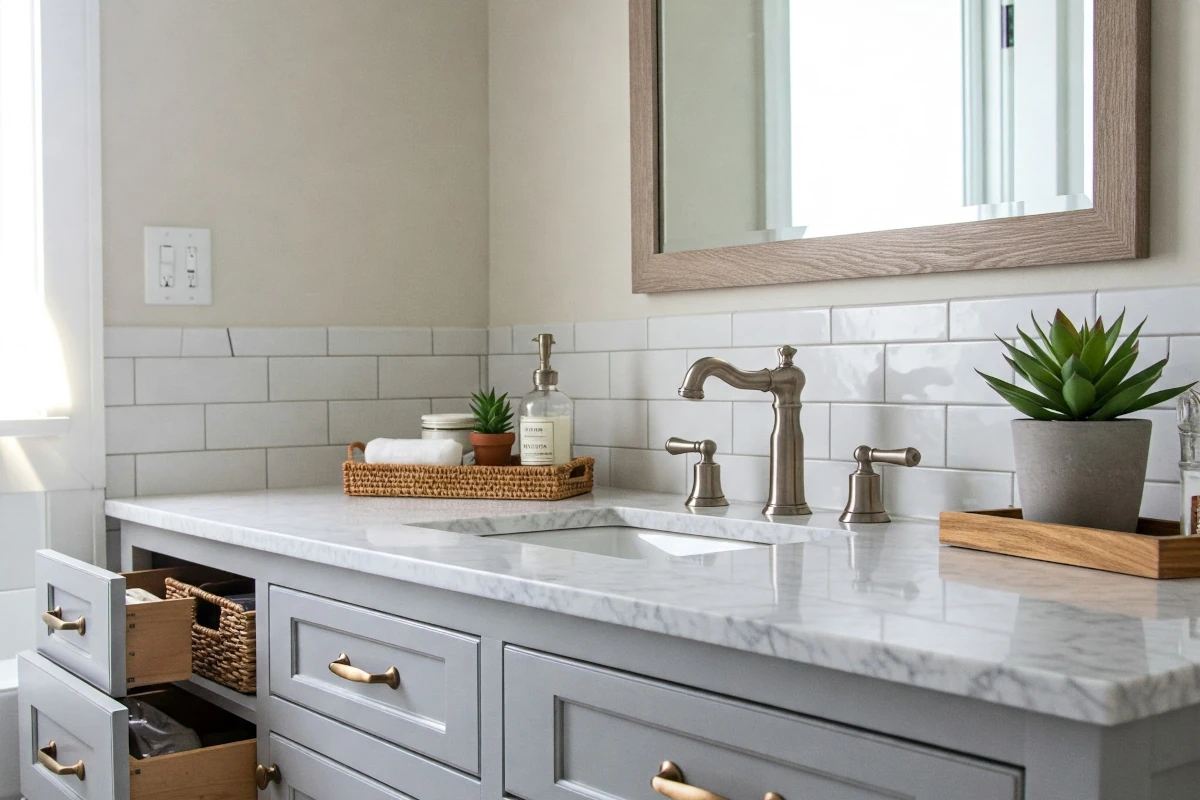
Step 4: Refresh the Countertop (Without Replacing It)
Let’s talk countertops! We don’t have to spend a fortune or rip anything out to make ours look brand new. As part of our bathroom vanity makeover, we can refresh the surface with contact paper or a countertop epoxy kit.
Contact paper is quick, easy, and renter-friendly. It comes in beautiful styles like marble, granite, or even concrete. Once we clean and dry the surface, we simply measure, cut, peel, and smooth it on. Use a credit card or smoothing tool to press out any bubbles as you go.
If we want something more permanent, epoxy kits are a great choice. They take a bit more time and care, but the payoff is huge. We can create a glossy, stone-like finish that holds up over time. Just be sure to follow the kit instructions exactly, especially when it comes to prep and dry time.
No matter which method we choose, surface prep is key. Wipe down the entire counter, removing grease, dust, or leftover soap. If it’s glossy, give it a light sanding to help everything stick better.
With a little effort, we can completely transform the countertop. It’s one of the easiest ways to make our bathroom vanity makeover feel high-end without the high cost. Let’s make that surface shine!
Step 5: Upgrade the Sink Fixtures
Let’s keep the momentum going! If we’re already swapping hardware, why not upgrade the faucet too? It’s easier than it sounds.
First, turn off the water supply under the sink. Then, disconnect the old faucet using an adjustable wrench. Keep a towel handy—there might be a little leftover water. While we’re under there, it’s a great time to clean out any gunk or leaks we’ve been ignoring.
When choosing a new faucet, try to match the finish to your knobs and pulls. This small detail pulls the whole bathroom vanity makeover together.
Before installing the new faucet, wrap plumber’s tape around the threads. This helps prevent leaks and gives us a better seal. Follow the instructions that come with your faucet—it usually involves tightening a few nuts and connecting the water lines.
Once it’s in, turn the water back on slowly and check for drips. If everything looks good, give it a test run!
Swapping the faucet adds instant polish. It’s one of those small upgrades that really feels like a big win. With this step done, our bathroom vanity makeover just keeps getting better!
Step 6: Add Stylish Storage and Decor
Now that our vanity is looking fresh, let’s give it some style and function. A bathroom vanity makeover isn’t complete without a little organization and decor. Start inside the drawers or cabinet. Add baskets, bins, or shelf risers to keep things neat and easy to grab. When everything has a spot, mornings feel way less chaotic.
Next, let’s make the countertop work smarter. Use a decorative tray to corral daily items like soap, lotion, or your toothbrush. Clear jars or canisters are perfect for cotton swabs or hair ties—and they look great too. To finish it off, add a small plant or candle. Greenery brings life to the space, and a soft scent makes it feel like a mini spa.
This step is all about the details. These little touches make our bathroom vanity makeover feel intentional, cozy, and complete. We’re not just upgrading the look—we’re upgrading how it works for us every day.
Optional Add-On: Easy Backsplash or Mirror Frame
Want to take your bathroom vanity makeover to the next level? Let’s add a little extra charm with two easy upgrades.
First up, peel-and-stick backsplash tiles. They come in tons of styles—subway, marble, or even bold patterns. No grout, no mess, and they’re renter-friendly too. Just measure, cut, peel, and stick. In less than an hour, your vanity gets a whole new backdrop.
Next, let’s talk about that plain builder-grade mirror. We can frame it with a simple DIY wood trim. All we need is some pre-cut wood, paint or stain, and adhesive. Once it’s dry, we attach it right to the mirror’s surface. Instant upgrade!
Both of these projects add a custom feel without a big cost or time commitment. Plus, they tie the whole bathroom vanity makeover together beautifully.
If we’ve got a little extra time and budget, these touches are totally worth it. They’ll make our space feel more polished—and a lot more us.
Troubleshooting Tips for Common Mistakes
Even the best DIY plans hit a few bumps. But don’t worry—our bathroom vanity makeover can still turn out great.
Got paint drips? Let them dry completely first. Then, lightly sand the area and touch it up with a fresh coat. Rushing will only make it worse.
If your contact paper starts bubbling, don’t panic. Use a smoothing tool or a credit card to press out the air. Work slowly from the center out to the edges.
Hardware not lining up? That’s a common one. Just fill the old holes with wood filler, let it dry, and sand smooth. Then, carefully mark and drill new ones.
These little fixes can make a big difference. And honestly, they’re part of the learning process. With a bit of patience, we’ll keep our bathroom vanity makeover looking polished and professional. Mistakes happen—what matters is how we handle them!
Final Touches: Seal It Up and Style It Right
We’re almost done! To finish this bathroom vanity makeover strong, let’s lock in our hard work with a few final touches.
First, if we used paint, a clear sealant helps protect it from moisture and everyday wear. Next, caulk around the sink or top edges to keep things clean and sealed.
Finally, when putting everything back, do it with intention. Keep the space tidy, functional, and stylish.
These last steps may be small, but they really pull the whole bathroom vanity makeover together. Now step back and admire that fresh, fabulous upgrade—we did it!
Wrapping It Up: Big Impact, Small Effort
Look at what we pulled off—a total bathroom vanity makeover without breaking the bank or our backs! With just a weekend and a little elbow grease, we gave new life to a tired old space. It’s proof that small changes can make a big impact.
So let’s celebrate this win! We took the first step, learned some skills, and now have a bathroom that feels fresh and functional. Feeling inspired? Let’s keep the momentum going. One DIY project at a time, we’re making our home feel more like us.
Frequently Asked Questions (FAQ) About Bathroom Vanity Makeover
1. Can I do a bathroom vanity makeover if I’m renting? Yes! Stick to renter-friendly updates like contact paper, peel-and-stick backsplash, and new hardware you can switch back later.
2. What kind of paint works best on bathroom vanities? Use semi-gloss or enamel paint. Both are moisture-resistant, durable, and easy to clean—perfect for bathroom surfaces.
3. How long does a bathroom vanity makeover really take? Most projects can be done in a weekend. Painting, hardware updates, and countertop refreshes each take just a few hours.
4. Do I need to sand before painting my vanity? A light sanding helps paint stick better, especially on glossy or laminate surfaces. It’s a simple step that makes a big difference.
5. Is contact paper waterproof for bathroom countertops? Contact paper is water-resistant, not waterproof. It holds up well with light use but avoid standing water or heavy scrubbing.