Do-it-Yourself (DIY) Gallery Walls
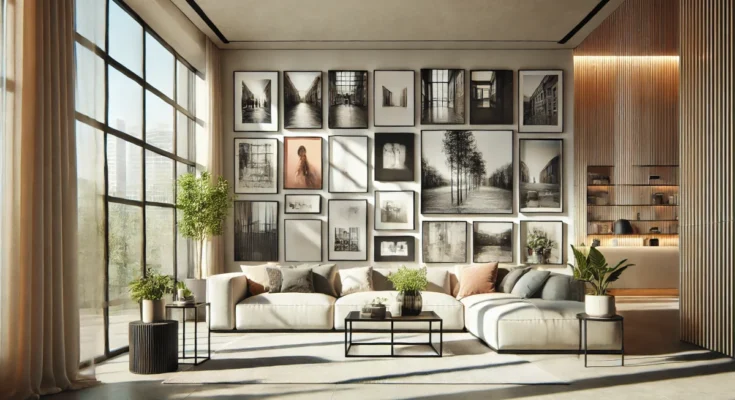
Have you ever walked into a room and been captivated by a stunning display of photos and art? That’s the magic of DIY gallery walls! They’re a perfect way to transform a blank wall into a personal masterpiece, showcasing memories, artwork, and style.
If you’re new to home decor projects, don’t worry—we’ve got you covered. This guide is designed especially for beginners. We’ll walk you through five simple steps to help you create a gallery wall that looks like a professional designed it. From planning your layout to selecting the perfect frames and tools, we’ll provide everything you need to get started.
We’ll also share tips on how to use affordable products, like picture frames and photo hanging kits, to make your project easy and budget-friendly. Let’s dive into this fun and creative DIY project!
Step 1: Plan Your Layout
Before hanging a single frame, it’s essential to plan your layout. A well-thought-out design will ensure your DIY gallery walls look polished and intentional. Rushing through this step can lead to awkward spacing or mismatched pieces, so let’s take our time and create a plan that works!
Choose a Theme or Color Palette
Start by picking a theme or color palette for your gallery wall. This helps unify the overall look, making it visually appealing. You can choose a theme based on art style, family photos, or even a specific mood like “coastal” or “modern.” Alternatively, select a color scheme—like neutral tones or bold colors—that complements the room’s decor. Sticking to a theme or color palette creates a cohesive, balanced gallery wall.
Decide on the Arrangement
Next, think about the arrangement of your frames. The layout can completely change the feel of your gallery wall. For a clean, organized look, go for a symmetrical grid layout with evenly spaced frames. If you want a more relaxed, eclectic feel, try an asymmetrical arrangement with different frame sizes and shapes. Remember, the key is balance. Even in an asymmetrical layout, the frames should feel evenly distributed across the wall.
Use Tools to Visualize
It’s always helpful to see how your DIY gallery walls will look before hammering nails into the wall. To do this, consider using paper cutouts or digital design apps to visualize the layout.
- Paper Cutouts: Cut pieces of paper to the size of your frames and tape them to the wall. This helps you experiment with different arrangements without committing to anything permanent. You can easily adjust the cutouts until you find a layout you love.
- Digital Design Apps: If you prefer a tech-savvy approach, use layout planning apps to create a virtual design of your gallery wall. Apps like WallApp or the gallery wall templates on Canva let you upload images of your frames and arrange them on a digital canvas.
These tools can save you from making unnecessary holes in your wall and help you feel confident about your final design. Taking the time to plan your layout is the foundation of any successful DIY gallery walls project. A well-organized plan leads to a stylish, professional-looking display that you’ll love!
Step 2: Select Your Frames and Art
Choosing the right frames and art is crucial to creating beautiful and cohesive DIY gallery walls. The frames and images you pick should match your theme and add personality to your space. Let’s explore how to make thoughtful selections that fit your style and vision.
Choose Frames That Match Your Theme
First, think about the overall theme of your gallery wall. Are you going for a modern, vintage, or bohemian vibe? Your frames should align with the theme to maintain a cohesive look.
- Modern Theme: Opt for sleek, minimalist frames in black, white, or metallic finishes. Simple lines will emphasize the artwork without distracting from it.
- Vintage Theme: Look for distressed wood or ornate, antique-style frames to complement older photos or classic art.
- Bohemian Theme: Mix materials like wood and metal, or use colorful frames for a laid-back, eclectic feel.
Choosing frames that match your theme will tie the entire wall together and enhance the overall aesthetic.
Mix Frame Sizes and Styles
To add depth and visual interest, try mixing different frame sizes and styles. Large frames create a focal point, while smaller frames fill in gaps and add variety. Mixing materials—like wood, metal, and painted frames—also helps create a dynamic, eye-catching design.
However, while mixing frames is encouraged, avoid going overboard. Too many different styles can feel chaotic. Stick to a few complementary frame styles to keep the look cohesive.
Select Photos, Art, or Prints
The next step is choosing the content for your DIY gallery walls. Whether you’re using family photos, artwork, or a mix of both, your selection should match the aesthetic you’re aiming for.
- Family Photos: These are a popular choice for gallery walls and give a personal touch. Choose black-and-white photos for a classic look, or go for color photos that fit your theme.
- Artwork and Prints: If you prefer art over photos, pick pieces that reflect your color palette and style. Printable artwork is a budget-friendly option, available from sites like Etsy. You can find everything from abstract art to botanical prints that fit any theme.
For a balanced gallery wall, mix photos and art prints, or alternate between the two to create layers of visual interest.
Affordable Frame Options
You don’t have to spend a fortune on frames. Many affordable and stylish frames are available from online retailers.
Amazon offers a wide selection of budget-friendly frames, perfect for any style or theme. Look for gallery wall sets that include multiple frames in different sizes.
IKEA is another great source for affordable frames, particularly if you like clean, minimalist designs.
By selecting the right frames and art that complement your theme, you’ll be well on your way to creating stunning DIY gallery walls that reflect your personal style and creativity.
Step 3: Gather Your Tools and Materials
For successful DIY gallery walls, gathering the right tools and materials is crucial. Having everything ready before you start will make the process smoother and more enjoyable. Here’s a list of the essentials you’ll need to build your gallery wall:
- Picture frames: Choose frames that match your theme and design.
- Photo hanging kits: These often include nails, hooks, and wires, making it easy to hang your frames securely.
- Measuring tape: Essential for ensuring proper spacing and alignment between frames.
- Level: A must-have tool to keep your frames straight and avoid a crooked display.
- Nails or adhesive hooks: Depending on your wall type, use nails or damage-free adhesive hooks to hang your frames.
- Pencil and ruler: Use these for marking exact spots on the wall before hanging.
Optional tools, like frame mats, can give your photos a polished, professional look. You might also want to consider adding lighting, like picture lights, to highlight your gallery wall and create a focal point.
Organize all materials in one place before starting. This ensures you won’t have to stop in the middle of your project to search for missing items. Lay out your tools, frames, and hardware in a convenient spot so you can work efficiently.
Example products include affordable photo hanging kits, adhesive strips, and wall anchors, all available from Amazon or local hardware stores. By gathering everything you need upfront, you’ll be ready to start building your perfect DIY gallery walls!
Step 4: Hang Your Frames with Precision
Now that you’ve planned your layout and selected your frames, it’s time to hang your frames with precision. Getting this step right is key to creating professional-looking DIY gallery walls. Here’s a simple guide to help you hang your frames securely and evenly.
Measure and Mark the Wall
Start by measuring the wall where your gallery will go. Use a measuring tape to mark the center of the wall or the area where your main focal point will be. From there, measure and mark where each frame will hang. Be sure to follow your layout plan from Step 1. A pencil is handy for making light marks that can easily be erased later.
Keep Frames Level and Evenly Spaced
Use a level to ensure each frame hangs straight. This is especially important if you’re creating a grid layout. Even a slightly crooked frame can disrupt the entire look of your gallery wall. If you’re worried about keeping multiple frames level, a laser level can make the process faster and more accurate. For spacing between frames, a good rule of thumb is to leave 2 to 3 inches between each one. Keeping consistent spacing gives your gallery wall a clean, organized appearance.
Decide on Frame Height
Deciding the height of your DIY gallery walls depends on the wall space and the room’s layout. Typically, art should hang at eye level, about 57 to 60 inches from the floor to the center of the frame. If your gallery wall will go above furniture, leave 6 to 8 inches of space between the top of the furniture and the lowest frame. Adjust as needed based on your room’s design.
Choose Hanging Methods: Nails vs. Adhesive Hooks
Depending on the weight of your frames and your wall type, you’ll need to choose the best hanging method.
- Nails: For heavier frames, nails provide the most secure hold. Be sure to use the proper size nail for the weight of your frame.
- Adhesive Hooks: For lighter frames, damage-free adhesive hooks are a great option. They are easy to apply and won’t damage your walls, making them ideal for renters.
Both methods are widely available and can be found in any photo hanging kit.
Adjust As You Go
As you start hanging your frames, step back and evaluate how the gallery is coming together. Don’t be afraid to adjust frame placement as you go for the best visual impact. Sometimes, slight changes can make the entire wall feel more balanced.
With the right tools like a measuring tape, level, and the appropriate hanging hardware, you can hang your frames with precision and create stunning DIY gallery walls that enhance your space.
Step 5: Style and Finish Your Gallery Wall
After hanging your frames, it’s time to style and finish your DIY gallery walls with final touches that add personality and flair. Consider adding decorative objects like small sculptures or picture lights to highlight your artwork. A well-placed picture light can illuminate your gallery, making the photos and art stand out even more.
To create a dynamic look, add unique elements like plants or wall shelves. Small potted plants or hanging greenery can bring life and color to your gallery wall, softening the overall design. Wall shelves allow you to display additional items, like decorative objects or framed photos, without taking up extra space on the wall.
Maintaining your gallery wall over time is also important. You can easily refresh it by swapping out photos or art prints to keep the display current and personal. This is especially great for seasonal updates or showcasing new artwork. Consider rotating pieces or rearranging frames periodically to give the gallery wall a fresh look.
Example products like picture lights, decorative wall shelves, and greenery are readily available on Amazon and can help you take your gallery wall from great to stunning. With these finishing touches, your DIY gallery walls will be a focal point in your home for years to come.
Do-it-Yourself (DIY) Gallery Walls Conclusion
Creating your own DIY gallery walls is easier than you might think, even for beginners. By following these five simple steps—planning your layout, selecting the right frames and art, gathering your tools, hanging with precision, and adding stylish finishing touches—you’ll have a beautiful gallery wall in no time.
The process allows you to personalize your space and express your creativity. Whether you’re displaying family photos or your favorite art, the gallery wall reflects your unique style.
Now that you have the tools and tips, it’s time to get started! Gather your frames, a photo hanging kit, and start planning your layout. Enjoy the journey of building a display that not only looks great but feels personal. Ready to begin? Check out some affordable products like picture frames, photo hanging kits, and picture lights to make your project easier. Let’s turn those blank walls into a stunning gallery you’ll love!
Frequently Asked Questions (FAQ) About DIY Gallery Wall
1. What is the best height to hang a gallery wall? For the best visual impact, hang your gallery wall at eye level, about 57 to 60 inches from the floor to the center of the frames. If placing it above furniture, leave 6 to 8 inches of space between the furniture and the lowest frame.
2. Can I create a DIY gallery wall in a small space? Absolutely! In smaller spaces, focus on a more compact arrangement with fewer frames. Use smaller art pieces and frames to avoid overwhelming the space.
3. How do I avoid damaging my walls when hanging frames? For lighter frames, use adhesive hooks or strips that won’t damage the walls. Heavier frames should be hung with nails and anchors, depending on the wall type.


